3D Sublimation Film helps you put bright, colorful pictures on many surfaces. You can use it on flat shapes. You can use it on curved shapes. You can even use it on odd shapes. This technology makes your items look real and deep. If you know how it works, you can make cool designs for lots of things.
Tip: You can use 3D Sublimation Film for your own projects. You can also use it for business projects.
Key Takeaways
3D Sublimation Film lets you print bright images. You can use it on many surfaces. It works on flat, curved, and odd shapes.
This film gives clear and strong results. The prints do not scratch or fade fast. Your designs will look professional.
For the best results, use a high-resolution design. Save your design in the right file format before printing.
Use the correct heat and pressure when you transfer. This helps your prints stay bright and last longer.
3D Sublimation Film is flexible and useful. You can use it for personal or business projects. It lets you make special custom designs.
3D Sublimation Film
Features
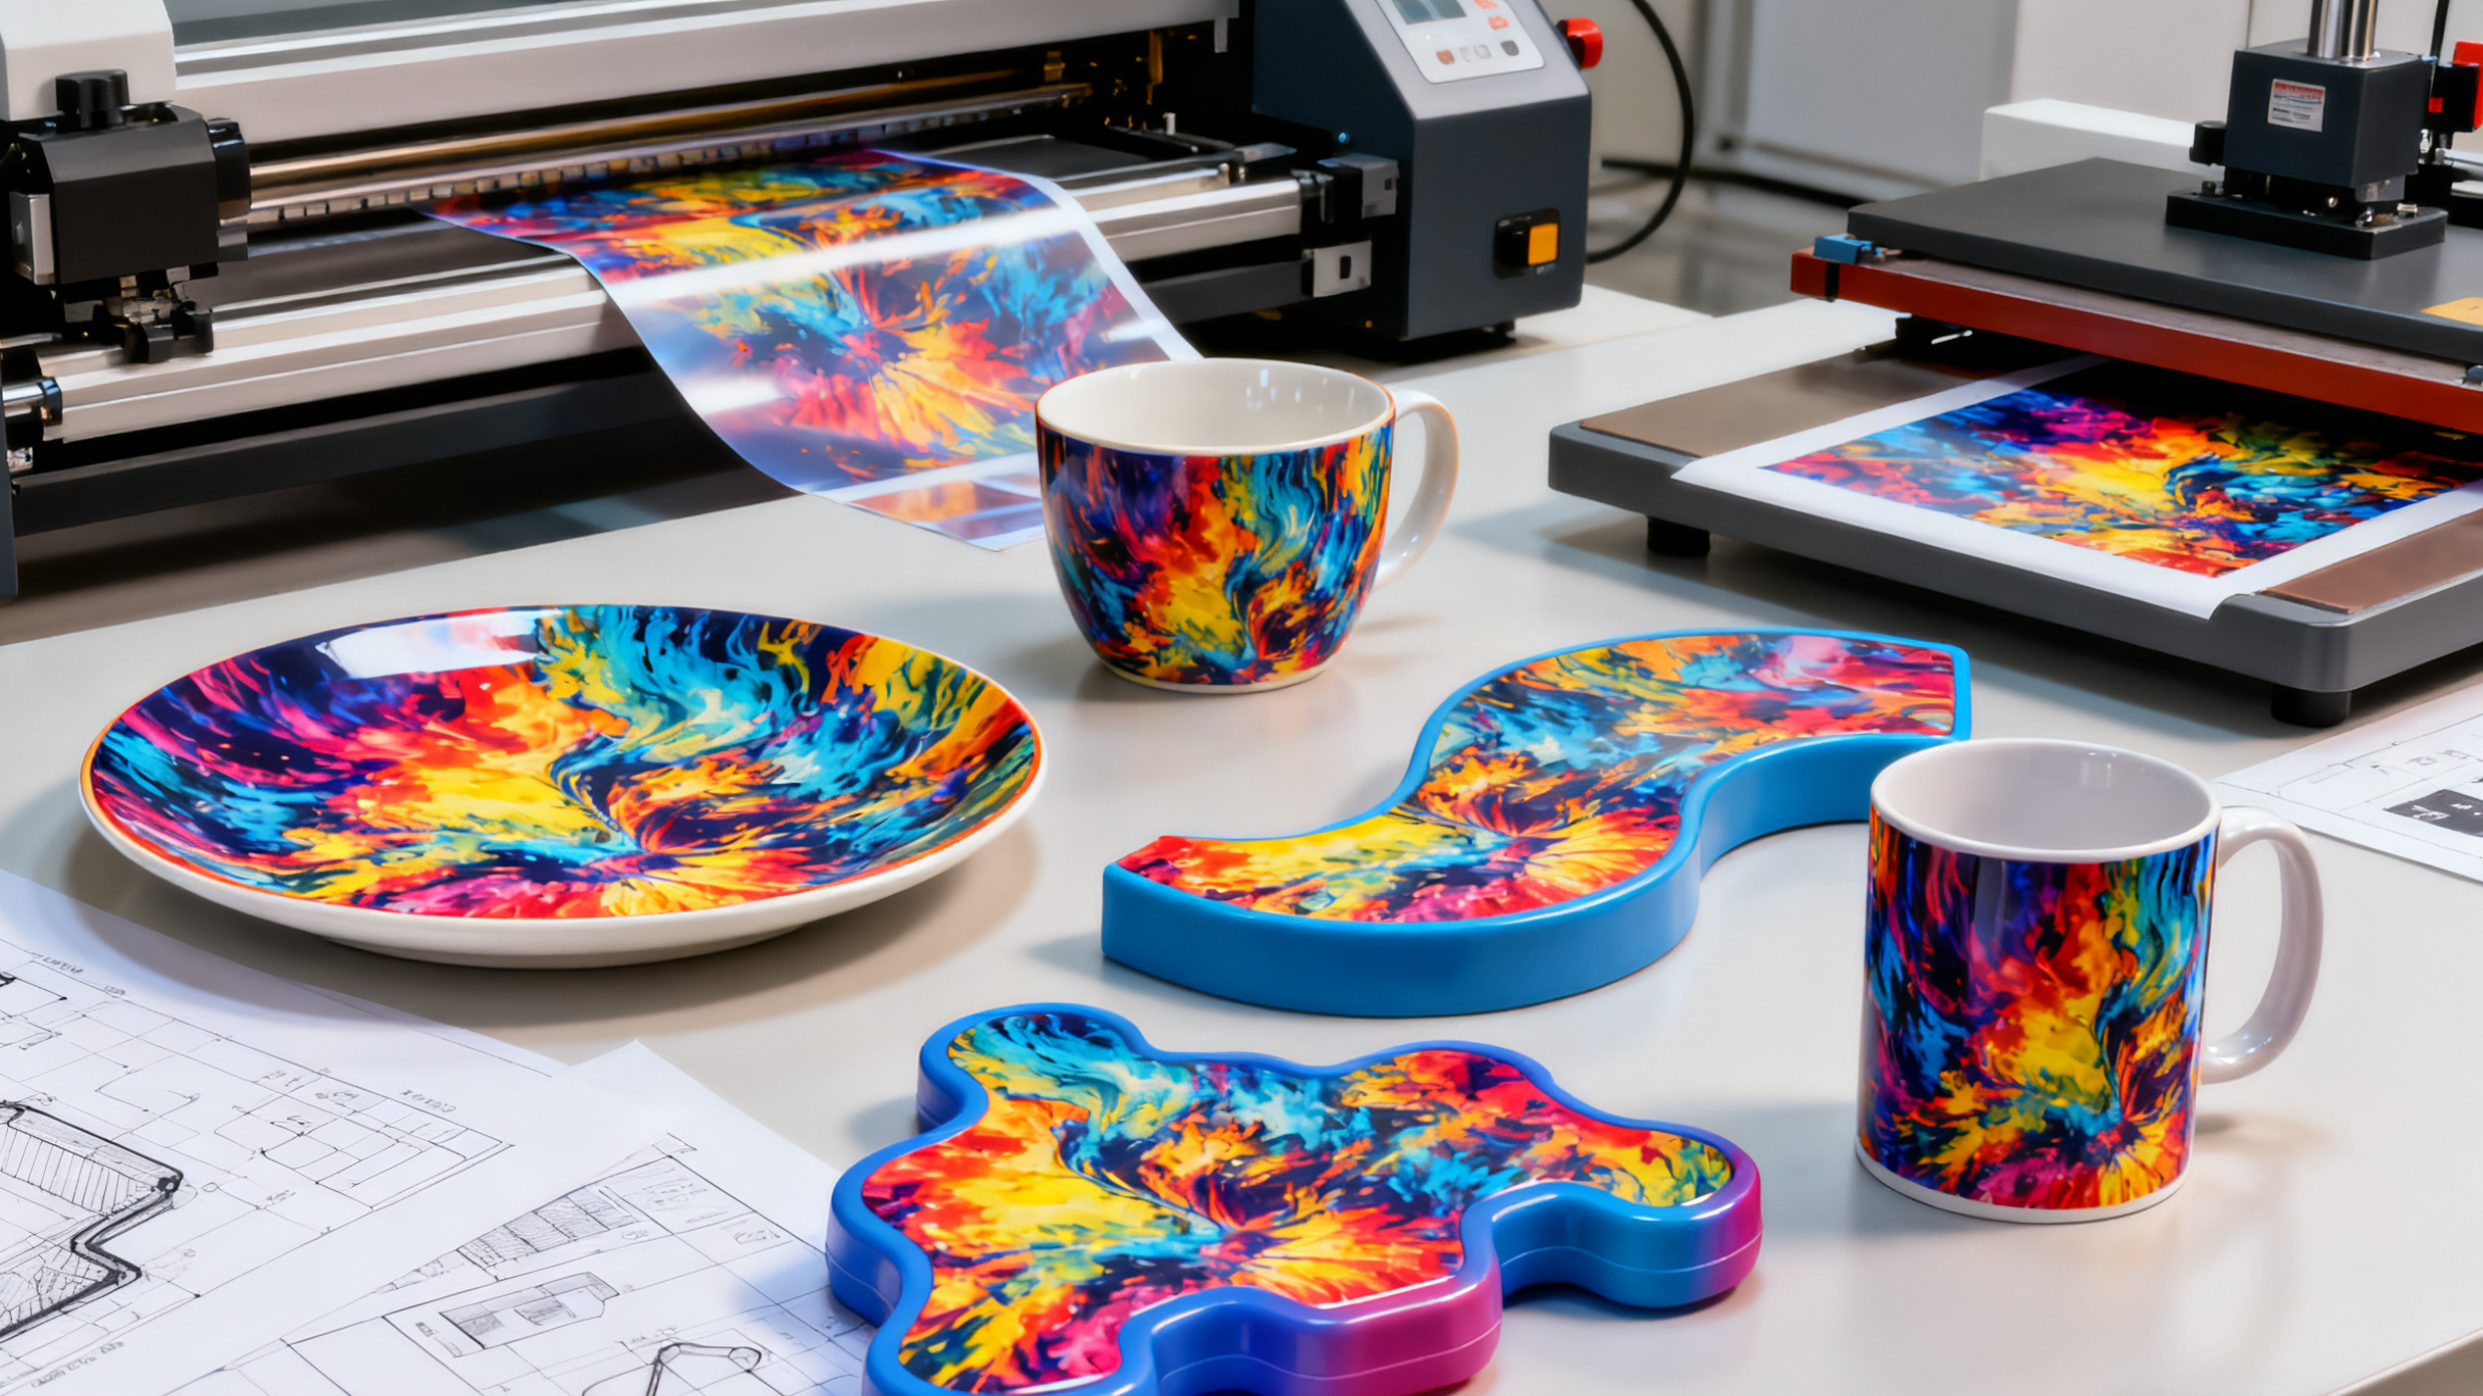
You can use 3D Sublimation Film to make many things look nice. This film lets you put bright pictures on flat, curved, or odd shapes. The finish is smooth and looks like a pro did it. The colors stay bright and do not fade fast.
Here are some features you should know:
Wrap-around printing: You can print on the whole item, even the edges.
High resolution: The pictures look sharp and clear.
Durable results: The film does not scratch or get ruined by water.
Flexible application: You can use it on plastic, metal, glass, and other stuff.
Note: You can make designs that look three-dimensional. The film makes your things look deep and real.
Comparison with Traditional Printing
You might wonder how 3D Sublimation Film is different from regular printing. Let’s see what makes them not the same:
Feature | 3D Sublimation Film | Traditional Printing |
|---|---|---|
Surface Coverage | Works on all shapes | Works on flat shapes |
Image Quality | Very sharp and bright | Good, but less bright |
Durability | Does not scratch or fade | Can scratch or fade |
Design Flexibility | Prints all around | Prints only on flat parts |
Visual Effect | Looks deep and real | Looks flat |
You can see 3D Sublimation Film gives you more choices. You can decorate things that regular printing cannot do. The pictures last longer and look special.
Tip: If you want your things to look cool, try 3D Sublimation Film instead of regular printing.
Process
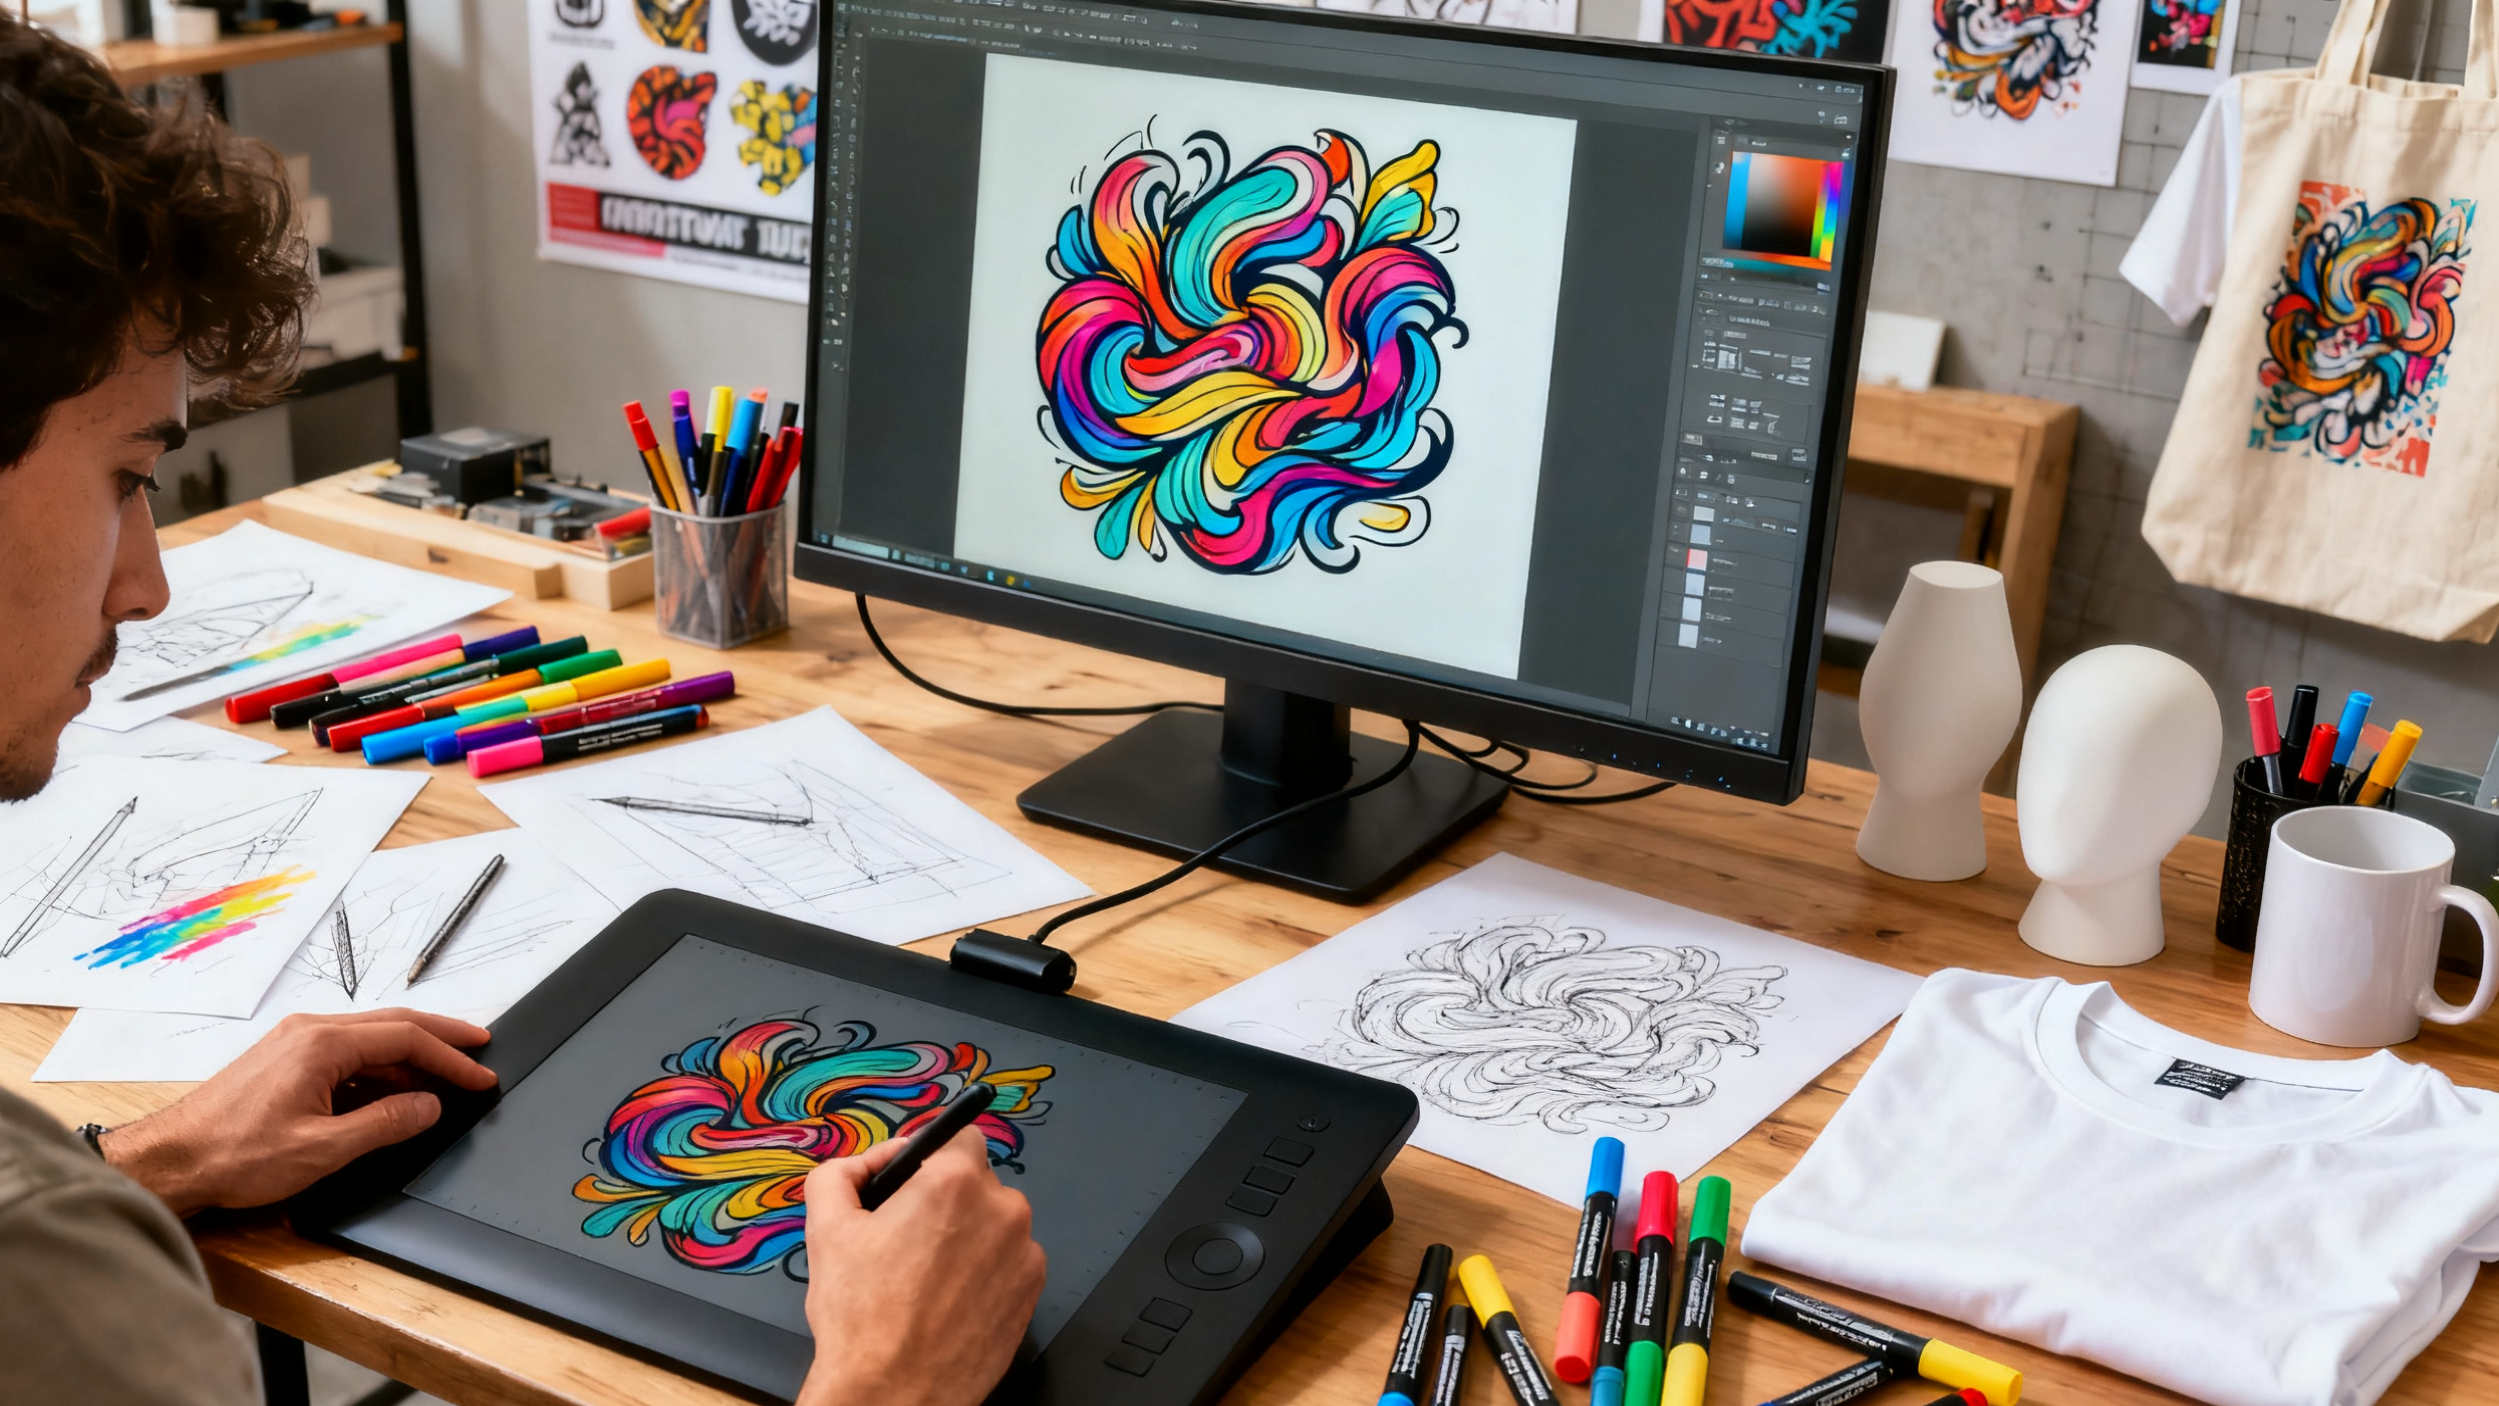
Design
You begin by making your artwork. A good design helps your product look nice and colorful. You need to think about a few things when you get your design ready for 3D Sublimation Film. Here is a table that shows what to check:
Design Consideration | Description |
|---|---|
Resolution | Make your artwork with high resolution (150-300 dpi) for clear prints. |
Color Mode | Use CMYK or CMYK-safe RGB for correct colors. |
File Format | Save your file as .png or .ai so it works well. |
Design Layout | Use full-bleed images to cover the whole item and avoid white edges. |
Size Matching | Make sure your design fits the product size so there are no blank spots. |
Image Mirroring | Flip your image before printing because of the transfer step. |
You can use lots of software to make your design. Some popular ones are:
Adobe Photoshop
Adobe Illustrator
Affinity Photo
Affinity Designer
CorelDraw
Silhouette Studio
Cricut Design Space Desktop
Canva
Procreate for iPad
Gimp
Inkscape
Tip: Always check your design’s size and resolution before printing. This helps you stop mistakes and saves materials.
Printing
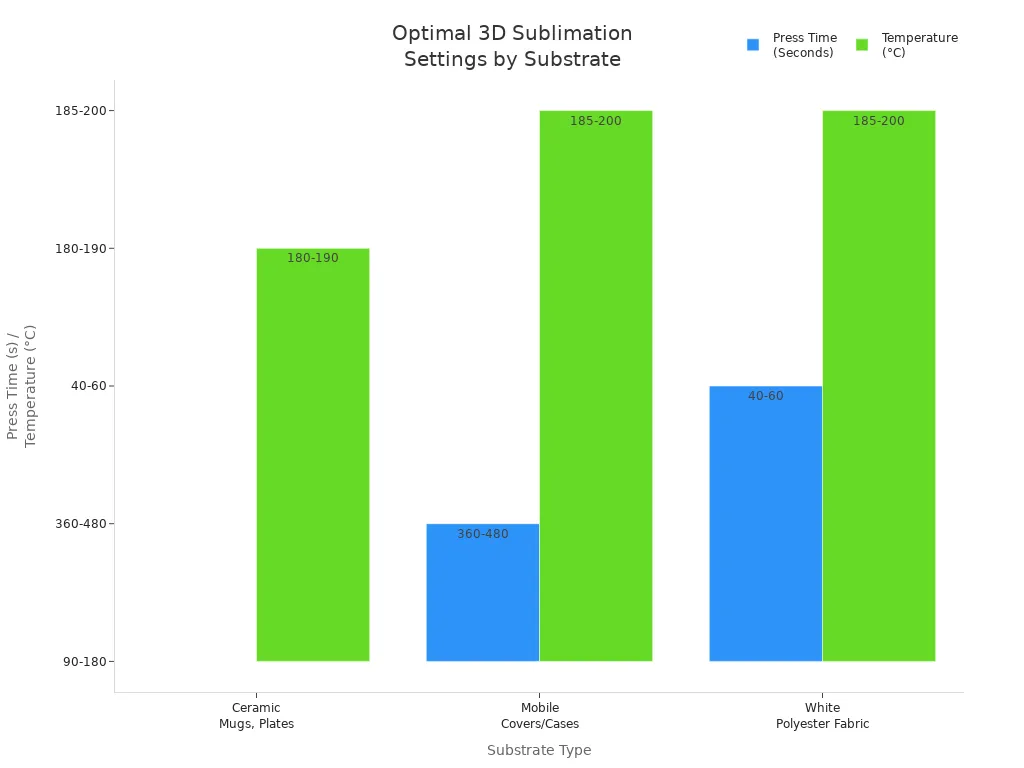
You print your design onto special film with a sublimation printer. You need sublimation ink because it turns into gas when heated. The ink sticks to your item’s surface. You must set your printer right to get the best print. Here is a table that shows the best settings for different items:
Substrate | Press Time | Temperature | Tips/Comment |
|---|---|---|---|
Ceramic Mugs, Plates, etc. | 90-180 Seconds | 180°C – 190°C / 356°F – 374°F | Cool well so they do not crack. |
Mobile Covers or Cases | 360-480 Seconds | 185°C – 200°C / 365°F – 392°F | Use 3D sublimation transfer. |
White Polyester Fabric | 40-60 Seconds | 185°C – 200°C / 365°F – 392°F | Pre-press to take out moisture. |
You should follow these steps for good results:
Go to Print Settings
Pick Paper Type: Epson Matte
Set Quality to High
Choose Colour
Go to Additional Settings
Turn on Mirror Image
Note: Always use good sublimation ink. This keeps your colors bright and helps them last.
Transfer
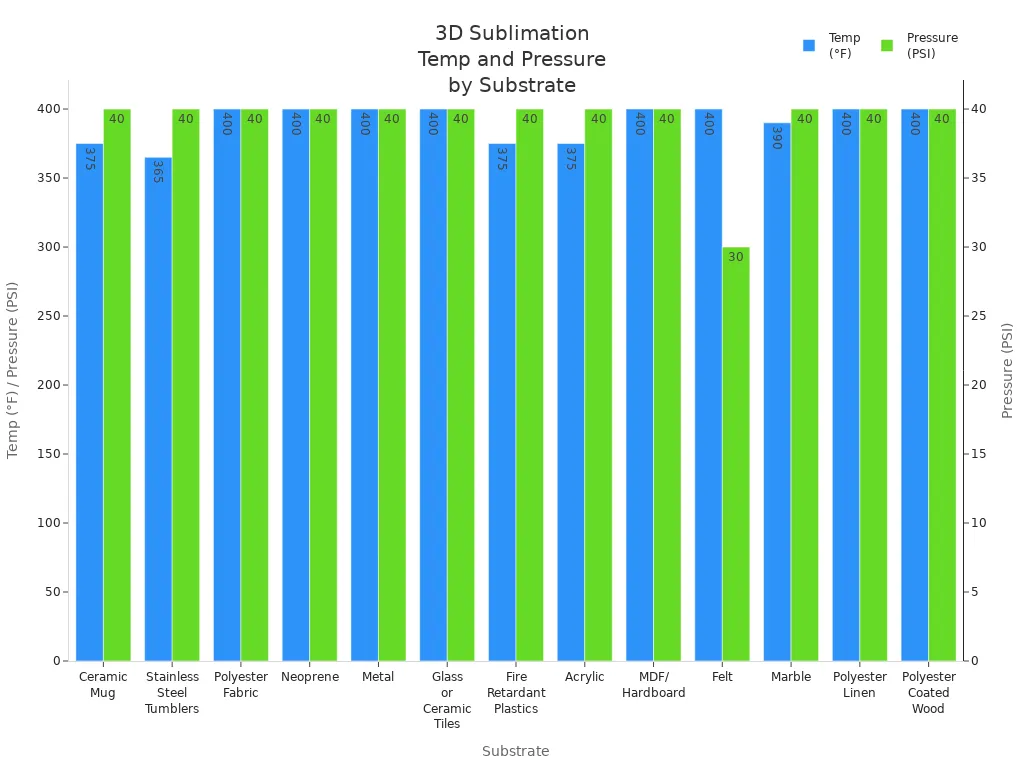
You move the printed film onto your item with heat and pressure. You need a heat press or vacuum press for this step. The heat makes the ink turn into gas. The pressure pushes the ink deep into the item’s surface. This lets you print on curved and odd shapes. You must use the right temperature and pressure for each material. Here is a table to help you:
Substrate | Press Time | Temp | Pressure | Tips/Comments |
|---|---|---|---|---|
Ceramic Mug | 150-300 seconds | 350 – 400° F | High (40 PSI) | Cool mugs after transfer. |
Stainless Steel Tumblers | 75 seconds | 365° F | High (40 PSI) | Turn for full wrap. |
Polyester Fabric | 45 seconds | 400° F | High (40 PSI) | Pre-press to take out moisture. |
Neoprene | 45 seconds | 400° F | High (40 PSI) | Use tight knit for bright color. |
Metal | 60 seconds | 400° F | High (40 PSI) | Put absorbent sheet under product. |
Glass or Ceramic Tiles | 420 seconds | 400° F | High (40 PSI) | Press from back, use silicon pad. |
Fire Retardant Plastics | 40-75 seconds | 375° F | High (40 PSI) | Take off plastic coating before pressing. |
Acrylic | 60 seconds | 375° F | High (40 PSI) | Take off plastic coating before pressing. |
MDF/Hardboard | 60 seconds | 400° F | High (40 PSI) | Take off plastic coating, press with transfer paper on top. |
Felt | 60 seconds | 400° F | Medium (30 PSI) | Put heavy object on item after pressing. |
Marble | 120 seconds | 390° F | High (40 PSI) | Peel transfer paper while hot. |
Polyester Linen | 60 seconds | 400° F | High (40 PSI) | Press with item facing up. |
Polyester Coated Wood | 60 seconds | 400° F | High (40 PSI) | Take off plastic coating before pressing. |
You might have some problems during transfer. Here is a table that shows common problems and how to fix them:
Challenge | Solution |
|---|---|
Adhesion Problems | Use the right film and adhesive powder. Clean the fabric. Change heat press settings. |
Ink Smudging | Let transfers cool before touching. Cure carefully. |
Color Fading | Use good transfers. Follow curing times. Give care instructions. |
Film Wrinkling | Use smooth, good film. Handle and store film gently. |
Inconsistent Transfers | Put adhesive powder evenly. Check heat press. Test small batches. |
Adhesive Powder Residue | Use the right amount of powder. Shake off extra. Try lower-adhesive powders for soft fabrics. |
Compatibility With Fabrics | Test transfers on different fabrics. Ask suppliers for help. |
Equipment Maintenance | Clean printers and presses often. Follow care rules. |
Tip: Always test your process on a small item first. This helps you find problems before you make a lot of products.
Finishing
You finish your item to make it look better and last longer. Dye sublimation makes prints that stay bright and strong. You can use special powder finishes to add texture or shine. Some companies use special powders to make products glossy or matte. You can also wrap the transfer film around your item and use a vacuum process for a smooth finish.
Dye sublimation prints straight onto plastics and other materials. This makes your product tough and colorful.
3D dye sublimation uses inkjet printing and vacuum sealing for a deep, wrap-around look.
Powder finishes add texture and shine. These finishes protect your product and make it look special.
Wrapping the transfer film and using a vacuum process gives your item a pro finish.
Note: Good finishing helps your product stay bright and strong for a long time.
Materials and Equipment
Film Types
You can find several types of film for 3D sublimation. Each type works best with certain products. Some films have a glossy finish. Others give a matte look. You might choose a flexible film for items with curves. Rigid films work well for flat surfaces. Some films offer extra protection against scratches. You should always match the film type to your project. This helps you get the best color and finish.
Tip: Test a small piece of film before starting a big project. This helps you avoid mistakes.
Substrates
You need to pick the right substrate for your design. Some materials work better with 3D Sublimation Film. The table below shows common substrates and their advantages:
Substrate | Advantages |
|---|---|
PET | Good ink absorption, high color transfer rate |
PC | Suitable for irregular and curved surfaces |
PVC | High-quality color performance |
PE | Good ink fixation effects |
PET gives you bright colors. PC lets you print on curved or odd shapes. PVC makes your images look sharp. PE holds the ink well. You should choose the substrate that fits your product and design needs.
Essential Tools
You need the right tools to get good results. Here is a list of what you should have:
Sublimation foil
Heat press machines
Substrate preparation tools
Cutting and trimming tools
Measuring and alignment tools
Safety equipment
A heat press machine helps you transfer your design. Preparation tools clean and ready your item. Cutting tools help you trim the film. Measuring tools keep your design straight. Safety equipment keeps you safe during the process.
Note: Always use safety gear when working with heat and chemicals.
Advantages
Visual Depth
Your products can look special with great visual depth. 3D Sublimation Film lets you use bright colors and real-looking images. You can put designs on curves and edges. This makes your design look real from all sides. This effect helps your items look cool and pro. People will see the difference right away.
Tip: Use lots of colors for the best 3D look.
Versatility
You can decorate many kinds of products with this method. 3D Sublimation Film works on flat, curved, and odd shapes. You do not have to stop your ideas. You can use it on plastics, metals, glass, and more. Here is a table that shows how printing methods compare:
Printing Method | Suitable Materials | Product Shapes |
|---|---|---|
3D Sublimation Film | Plastics, metals, glass, ceramics, fabrics | Flat, curved, irregular |
Dye Sublimation | Polyester, certain plastics | Limited to specific shapes |
UV Printing | Wood, glass, metal, various plastics | Wide range of shapes and sizes |
You can see 3D Sublimation Film gives you more choices. You can print on almost any shape or material.
Durability
You want your designs to last a long time. Prints made with 3D Sublimation Film stay bright and strong. The ink goes deep into the surface. It does not fade, crack, or peel easily. Your products look new, even after lots of use. UV printing can scratch or wear off. Sublimation prints last better in many places.
Note: If you want your designs to last, pick 3D Sublimation Film.
Applications
Consumer Products
You see 3D Sublimation Film on many things you use. It helps put bright pictures and designs on items at home, school, or work. You can find it on cushions, canvas, and photo panels. It is also on picture frames, caps, hats, and accessories. Magnets and keyrings use it too. Tumblers, mugs, and beer steins have these prints. Jigsaw puzzles and games use this film. You see it on umbrellas and patches. Soft toys and homeware can have these designs. Plates, signs, and clocks use it. Underwear, nightwear, hoodies, and jackets can show bright images. Trophies, medals, and tools use this technology. Car accessories and stationery have these prints. Smartphone and PC cases use it. Lighting and pet products can have these designs. You also see it in special gifts for holidays like Christmas, Mother’s Day, and Father’s Day. Many people pick these products because they want something colorful and unique.
Industrial Uses
Factories and companies use this technology to decorate lots of products. They use it for sports gear, promotional items, and branded merchandise. Companies make awards, signs, and display panels with it. The process works for small and big batches. You get sharp pictures on curved or odd-shaped items. This helps companies make products that stand out in stores.
Customization
You can make almost anything personal with 3D Sublimation Film. You can print on flat, round, or even ball-shaped items. This lets you design things that match your style or brand. Many people want custom items for their homes or as gifts. Businesses use this method to make products that get noticed. More people want personalized goods every year. Experts think the market will grow by 15% each year. You can use this process to give customers what they want.
Tip: Try making your own custom gifts or branded items. You will see it is easy and fun to use this technology.
3D sublimation film helps you put bright pictures on many shapes. You use special ink with heat and pressure to make deep colors. This way, your designs look strong and really stand out.
Professionals say you should:
Save money to keep up with others.
Use on-demand production to avoid waste.
Set up your workspace so it works well. Watch how much you spend on power. Buy your materials in big amounts to save money. Try 3D sublimation film to make your products special.
FAQ
What items can you decorate with 3D sublimation film?
You can decorate mugs, phone cases, trophies, and even curved items. The film works on many shapes and materials. You get bright, lasting images on almost any product.
Do you need special equipment for 3D sublimation?
Yes, you need a sublimation printer, heat press, and special film. You may also use a vacuum press for curved items. These tools help you get the best results.
How do you keep colors bright after printing?
Use high-quality sublimation ink and film. Follow the right heat and pressure settings. Let your item cool before touching it. This keeps your colors bright and sharp.
Is 3D sublimation film safe for food-contact items?
Most 3D sublimation films are not food-safe. You should not use them on surfaces that touch food or drinks. Always check the product label for safety information.